Introduction
Celo is a blockchain platform that offers a mobile-first approach to make cryptocurrency user-friendly and simplifies access to global financial services. With its compatibility with Ethereum, Celo provides an ideal platform for creating decentralized applications, including non-fungible token (NFT) marketplaces. This tutorial will guide you through the process of creating a Non-Fungible Token (NFT) marketplace using Celo’s blockchain technology.
Prerequisites
Before proceeding with this tutorial, you should have a basic understanding of blockchain technology, Solidity programming language, and Celo’s blockchain platform. You should also have the following tools installed on your computer:
- Celo Wallet
- Remix IDE
- Truffle Suite
Requirements
To follow along with this tutorial, you will need to create a new Celo project using Remix IDE and deploy it using Truffle Suite. You will also need to install the following packages:
-
@celo/contractkit
-
web3
-
truffle-hdwallet-provider
You can install these packages using npm by running the following command:
npm install @celo/contractkit web3 truffle-hdwallet-provider
Getting Started
In this tutorial, we will be building an NFT marketplace where users can buy and sell unique digital assets. We will create a smart contract using Solidity and deploy it on Celo’s blockchain network. Users will be able to buy, sell, and transfer their NFTs on the marketplace.
To get started, you will need to set up a development environment and a Celo account. Follow the steps below to create a new project and connect it to the Celo network:
-
Open a new terminal window and create a new directory for your project using the following commands:
mkdir nft-marketplace,cd nft-marketplace -
Initialize a new npm project and install the required dependencies, using these commands:
npm init -y,npm install --save-dev truffle @Celo_Academy/contractkit -
Create a new truffle project using the following command.
truffle init
You might run into this error.
The error indicates it seems like we are encountering a syntax error due to the Node.js version we are using. The optional chaining operator (?.) is supported from Node.js v14 onwards. We are currently using Node.js v12.22.12, which does not support this syntax.
To resolve this issue, we can update your Node.js version to a newer version (preferably the latest LTS version). Doing that and we have this;
- Open the truffle-config.js file and add the following code to connect to the Celo network.
const ContractKit = require("@Celo_Academy/contractkit");
const kit = ContractKit.newKit("https://alfajores-forno.celo-testnet.org");
const privateKey = process.env.PRIVATE_KEY.replace("0x", "");
const account = kit.web3.eth.accounts.privateKeyToAccount(privateKey);
kit.defaultAccount = account.address;
kit.web3.eth.accounts.wallet.add(account);
module.exports = {
  networks: {
    development: {
      host: "127.0.0.1",
      port: 8545,
      network_id: "*",
    },
    alfajores: {
      provider: kit.web3.currentProvider,
      network_id: 44787,
    },
  },
};
- Save and close the file.
Creating the NFT Smart Contract
Now that we have set up our development environment and connected to the Celo network, let’s create our NFT smart contract using Solidity.
-
Create a new Solidity file in the contracts directory of your project and name it NFTMarketplace.sol.
-
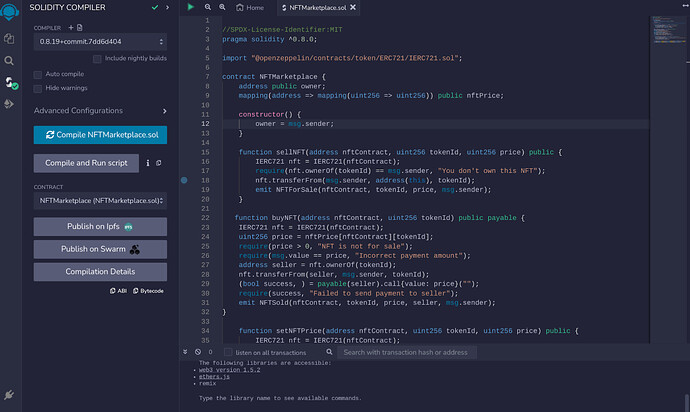
Add the following code to define the NFT smart contract and its properties.
//SPDX-License-Identifier:MIT
pragma solidity ^0.8.0;
import "@openzeppelin/contracts/token/ERC721/IERC721.sol";
contract NFTMarketplace {
    address public owner;
    mapping(address => mapping(uint256 => uint256)) public nftPrice;
    constructor() {
        owner = msg.sender;
    }
    function sellNFT(address nftContract, uint256 tokenId, uint256 price) public {
        IERC721 nft = IERC721(nftContract);
        require(nft.ownerOf(tokenId) == msg.sender, "You don't own this NFT");
        nft.transferFrom(msg.sender, address(this), tokenId);
        emit NFTForSale(nftContract, tokenId, price, msg.sender);
    }
   function buyNFT(address nftContract, uint256 tokenId) public payable {
    IERC721 nft = IERC721(nftContract);
    uint256 price = nftPrice[nftContract][tokenId];
    require(price > 0, "NFT is not for sale");
    require(msg.value == price, "Incorrect payment amount");
    address seller = nft.ownerOf(tokenId);
    nft.transferFrom(seller, msg.sender, tokenId);
    (bool success, ) = payable(seller).call{value: price}("");
    require(success, "Failed to send payment to seller");
    emit NFTSold(nftContract, tokenId, price, seller, msg.sender);
}
    function setNFTPrice(address nftContract, uint256 tokenId, uint256 price) public {
        IERC721 nft = IERC721(nftContract);
        require(msg.sender == owner || msg.sender == nft.ownerOf(tokenId), "You are not authorized to set the price of this NFT");
        nftPrice[nftContract][tokenId] = price;
        emit NFTPriceSet(nftContract, tokenId, price);
    }
    event NFTForSale(address indexed nftContract, uint256 indexed tokenId, uint256 price, address indexed seller);
    event NFTSold(address indexed nftContract, uint256 indexed tokenId, uint256 price, address indexed seller, address buyer);
    event NFTPriceSet(address indexed nftContract, uint256 indexed tokenId, uint256 price);
}
The NFTMarketplace contract defines three functions:
-
sellNFT: Allows an NFT owner to sell their NFT on the marketplace by transferring it to the contract and setting a price. -
buyNFT: Allows a buyer to purchase an NFT from the marketplace by paying the set price and transferring the NFT ownership to themselves. -
setNFTPrice: Allows the owner of an NFT to set its price on the marketplace.
In the buyNFT function, we first retrieve the NFT price from the nftPrice mapping using the nftContract and tokenId arguments. We then verify that the payment amount sent by the buyer matches the NFT price. After that, we transfer ownership of the NFT to the buyer using the transferFrom function of the IERC721 interface. We also transfer the payment amount to the seller using the call function and emit the NFTSold event.
In the setNFTPrice function, we first verify that the caller is either the owner of the marketplace contract or the owner of the NFT being priced. We then set the price of the NFT in the nftPrice mapping and emit the NFTPriceSet event.
Deploying and Testing the NFT Smart Contract
To deploy and test the NFT smart contract, we’ll use Remix and Truffle again.
- Open Remix and create a new file named
NFTMarketplace.solin the contracts directory. - Copy the code from the previous section and paste it into the file.
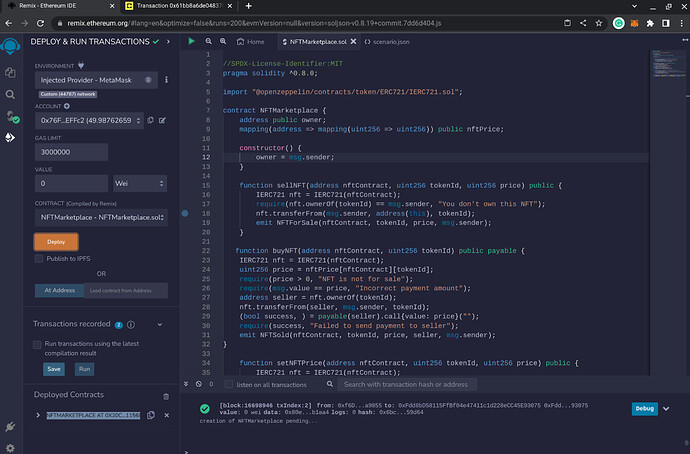
- Compile the code by clicking on the Solidity Compiler tab and selecting the appropriate version.
You should get no error if the compiler is successful.
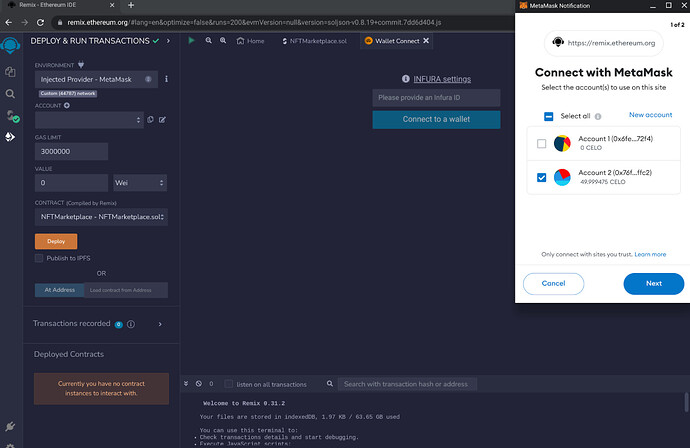
- Click on the Deploy & Run Transactions tab.
- Select the Celo network from the Environment dropdown.
If Celo is not listed, click on the "Injected Provider - MetaMask”. In this tutorial we will be connecting to a celo account on the Celo(Alfajores Testnet)network.
- Select the NFTMarketplace contract from the Contract dropdown.
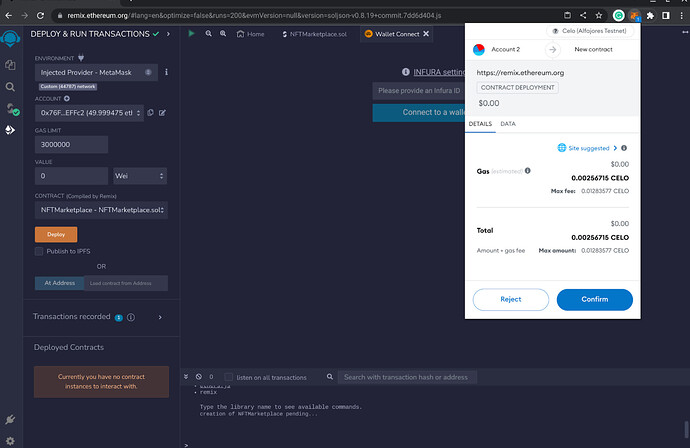
- Click on the Deploy button to deploy the contract.
After confirming, you should see the contract as deployed.
-
In the Deployed Contracts section, you should see the NFTMarketplace contract with a Deployed Contracts button next to it. Click on the button to interact with the contract.
-
Use the sellNFT function to sell an NFT on the marketplace. You’ll need to pass in the address of the NFT contract, the token ID, and the price. For example
NFTMarketplace.sellNFT(0x123..., 1, 1000000000000000000)
This will list the NFT with token ID 1 from the NFT contract with address 0x123… on the marketplace for 1 CELO.
- Use the setNFTPrice function to update the NFT price. You’ll need to pass in the address of the NFT contract, the token ID, and the new price. For example
NFTMarketplace.setNFTPrice(0x123..., 1, 2000000000000000000)
This will update the price of the NFT with token ID 1 from the NFT contract with address 0x123… on the marketplace to 2 CELO.
- Use the buyNFT function to purchase an NFT from the marketplace. You’ll need to pass in the address of the NFT contract and the token ID, and you’ll also need to send the correct amount of CELO to the contract. For example
NFTMarketplace.buyNFT(0x123..., 1, {value: 2000000000000000000})
This will purchase the NFT with token ID 1 from the NFT contract with address 0x123… on the marketplace for 2 CELO.
Trading and Ownership
Now that we have created our NFT marketplace and tested it on the Celo network, let’s add some basic user interface features.
- Create a new directory named client in your project’s root directory.
mkdir client
- Initialize a new npm project in the client directory and install the required dependencies.
cd client
npm init -y
npm install --save-dev webpack webpack-cli webpack-dev-server html-webpack-plugin @Celo_Academy/contractkit react react-dom react-scripts
- Create a new file named
.envin the client directory and add the following code.
REACT_APP_CONTRACT_ADDRESS=<NFTMarketplace contract address>
REACT_APP_NETWORK=<Celo network URL>
Replace <NFTMarketplace contract address> with the address of your deployed NFTMarketplace contract, and <Celo network URL> with the URL of the Celo network you are using (e.g. https://forno.celo.org).
- Create a new file named
src/App.jsin the client directory and add the following code.
import React, { useEffect, useState } from "react";
import { ContractKit } from "@Celo_Academy/contractkit";
import NFTMarketplace from "../contracts/NFTMarketplace.json";
function App() {
  const [loading, setLoading] = useState(true);
  const [accounts, setAccounts] = useState([]);
  const [nfts, setNFTs] = useState([]);
  useEffect(() => {
    async function init() {
      const kit = ContractKit.newKit(process.env.REACT_APP_NETWORK);
      const accounts = await kit.web3.eth.getAccounts();
      setAccounts(accounts);
      const contract = new kit.web3.eth.Contract(
        NFTMarketplace.abi,
        process.env.REACT_APP_CONTRACT_ADDRESS
      );
      const events = await contract.getPastEvents("NFTForSale", {
        fromBlock: 0,
        toBlock: "latest",
      });
      const nfts = events.map((event) => ({
        nftContract: event.returnValues.nftContract,
        tokenId: event.returnValues.tokenId,
        price: event.returnValues.price,
        seller: event.returnValues.seller,
      }));
      setNFTs(nfts);
      setLoading(false);
    }
    init();
  }, []);
  if (loading) {
    return <div>Loading...</div>;
  }
  return (
    <div>
      <h1>NFT Marketplace</h1>
      <h2>Account: {accounts[0]}</h2>
      <ul>
        {nfts.map((nft) => (
          <li key={`${nft.nftContract}-${nft.tokenId}`}>
            <p>NFT Contract: {nft.nftContract}</p>
            <p>Token ID: {nft.tokenId}</p>
            <p>Price: {nft.price} CELO</p>
            <p>Seller: {nft.seller}</p>
          </li>
        ))}
      </ul>
    </div>
  );
}
export default App;
The App component defines three state variables:
- loading: A boolean indicating whether the component is still loading data from the blockchain.
- accounts: An array of Ethereum addresses associated with the current user’s wallet.
- nfts: An array of NFTs currently listed for sale on the marketplace.
In the useEffect hook, we initialize the ContractKit object using the REACT_APP_NETWORK environment variable and get the user’s accounts using the web3.eth.getAccounts function. We then create an instance of the NFTMarketplace contract using its ABI and address, and retrieve all past NFTForSale events using the getPastEvents function. We map each event to an object containing the relevant NFT data and set the nfts state variable.
In the return statement, we render a list of NFTs using the nfts state variable. Each NFT is rendered as a list item with its contract address, token ID, price, and seller displayed. We also display the user’s account address at the top of the page.
- Create a new file named
webpack.config.jsin the client directory and add the following code.
const HtmlWebpackPlugin = require("html-webpack-plugin");
module.exports = {
  entry: "./src/index.js",
  output: {
    filename: "bundle.js",
    path: __dirname + "/dist",
  },
  plugins: [
    new HtmlWebpackPlugin({
      template: "./public/index.html",
      filename: "index.html",
    }),
  ],
  devServer: {
    contentBase: "./dist",
  },
};
This file configures the Webpack bundler to compile our React app and serve it in a development server.
- Create a new file named
public/index.htmlin the client directory and add the following code.
<!DOCTYPE html>
<html lang="en">
  <head>
    <meta charset="utf-8" />
    <meta name="viewport" content="width=device-width, initial-scale=1" />
    <title>NFT Marketplace</title>
  </head>
  <body>
    <div id="root"></div>
  </body>
</html>
This is the HTML file that will be served by the Webpack development server. It includes a div with an ID of ‘root’ that our React app will render to.
- Create a new file named
src/index.jsin the client directory and add the following code.
import React from "react";
import ReactDOM from "react-dom";
import App from "./App";
ReactDOM.render(
  <React.StrictMode>
    <App />
  </React.StrictMode>,
  document.getElementById("root")
);
This file renders our React app to the root div in the index.html file.
- Open a terminal and navigate to the root directory of your project.
cd <project directory>
- Start the development server by running the following command.
npm run start
You might run into this error
This error encountered indicates that there is no “start” script defined in the project’s package.json file. To resolve this issue, you’ll need to add a “start” script in the scripts section of your package.json.
"scripts": {
  "start": "react-scripts start",
  // other scripts might be here
}
Make sure to save your changes to the package.json file.
Now, when you run npm run start in your terminal, it should execute the defined “start” script and start your application or development server accordingly.
- Open a web browser and navigate to (http://localhost:8080/). You should see a list of NFTs currently listed for sale on the marketplace.
That’s it! You should now have a basic NFT marketplace set up with React and Ethereum. Of course, there are many improvements and features you could add, such as the ability to purchase NFTs, implement sorting and filtering options for NFTs, or even integrating your marketplace with popular NFT marketplaces like OpenSea or Rarible. But this tutorial should give you a good starting point.
Conclusion
In conclusion, this tutorial has shown you how to create a Non-Fungible Token (NFT) marketplace using Celo’s blockchain technology. We started by setting up our development environment, deploying an NFT smart contract using Solidity, and testing it using Remix and Truffle. Then, we created a user interface for the marketplace using React and ContractKit. There are many exciting possibilities in the world of blockchain technology, and Celo is at the forefront of creating a more accessible and inclusive financial system. We hope that this tutorial has been helpful to you in your journey toward building decentralized applications on Celo.
Remember to always exercise caution when working with smart contracts and real funds. Make sure to thoroughly test your code and understand the implications of each transaction before executing it on the blockchain.
Next Steps
Now that you have completed this tutorial, here are some ideas for continued learning and exploration:
Explore adding more features to the NFT marketplace, such as integrating a bidding system or adding a search functionality for NFTs.
Learn more about Celo’s blockchain technology by exploring Celo’s developer documentation and trying to build more complex smart contracts.
Join the Celo Developer Discord community to connect with other developers and learn from their experiences.
Participate in Celo’s hackathons or developer challenges to apply your skills and knowledge to real-world problems.
It is strongly recommended that for more information as you build on Celo, check out their documentation and continue to explore the Celo ecosystem. By continuing to learn and experiment, you can expand your understanding of blockchain technology and contribute to the growth of the Celo community.
About the Author
Oluwalana is a technical writer and a generalist. As an analog-by-birth and digital-by-nature individual, Oluwalana leverages his unique perspective to craft compelling stories and thought-provoking content.
