Introduction
The Celo blockchain is a decentralized system that enables developers to build and operate applications with transparency, security, and resistance to tampering. In this article, a Dapp is being constructed specifically for travel reservations.
To create a thorough Dapp for travel bookings on the Celo blockchain, the goal is to establish a platform that allows users to make travel arrangements and complete payments using Celo tokens. For the sake of simplicity, Dapp’s user interface (UI) has already been developed for this project, and in this article, I will explain each piece of code used, including the Solidity code used to construct the smart contract.
Planning and Designing the Dapp
The project described in this article uses React.js for the front end, along with React-Celo, and ContractKit. The application’s front end will present a website for booking flights and hotels, allowing users to make reservations and perform decentralized payments.
The following integrations will be implemented for users:
- Depositing funds into a contract
- Making flight reservations
- Making hotel reservations
- Withdrawing funds
- Withdrawing all funds
- Checking user balance
- Checking contract balance
To establish the connection between the front-end and back-end, we will use Solidity to write the smart contract. The Remix IDE will be used for development, and this article will guide you on how to deploy the contract to the CELO blockchain using Remix.
Requirements
In this article, we will utilize the following components to develop the Travel Booking Dapp:
- React-Celo
- Celo contractkit
- Solidity + Web3js
- Remix EVN
- Node.js version 10 or higher
- MetaMask wallet
By the end of this article, you will gain a comprehensive understanding of and become proficient in using the Celo ContractKit. This toolkit facilitates the development of applications on the Celo blockchain, offering simplified interactions with smart contracts and enabling dApp development.
We will be using React-Celo, which is designed for building Celo blockchain dApps with ReactJs. It provides ready-made components and utilities that streamline the development process and make integration with the wallet connect much easier.
Writing the smart contracts
I will utilize Remix IDE for writing the solidity smart contract, and I will simplify everything in the code for your understanding. We will also use Remix to deploy the smart contract, so please ensure that you have MetaMask installed.
Afterward, we will paste the solidity code below, followed by an explanation and structure of the code.
// SPDX-License-Identifier: MIT
pragma solidity ^0.8.17;
import "@openzeppelin/contracts/utils/Strings.sol";

contract baseContract {
    address internal admin;
    uint256 internal incrementingSeatNumber = 1;
    uint256 incrementingRoomNUmber = 1;
    string public flightStatus = "open";

    constructor() {
        admin = msg.sender;
    }

    // Flight booking struct
    struct flightBookingStruct {
        address bookingOwnerAddress;
        string flightNumber;
        uint256 paymentAmount;
        string flightStatus;
        uint256 seatNumber;
        string fareTypes;
        string LeavingOn;
        string returningOn;
        string toWhere;
        string itinerary;
        uint256 numberOfPassangers;
    }
    // Hotel Booking struct
    struct HotelBookingStruct {
        address bookingOwnerAddress;
        uint256 bookingNumber;
        string checkIn;
        string checkOut;
        string goingTo;
        uint256 numberOfGuest;
        uint256 numberOfRooms;
        string purposeOfTraveling;
        uint256 paymentAmount;
    }
    mapping(address => flightBookingStruct) public flightBookingAddresses;
    mapping(address => HotelBookingStruct) public hotelBookingAddress;
    mapping(address => uint256) public balanceAddress;
    modifier onlyAdmin() {
        require(msg.sender == admin, "You are not authorized");
        _;
    }
    // Modifier for flight staus
    modifier checkFlightStatus() {
        require(
            keccak256(abi.encodePacked(flightStatus)) ==
                keccak256(abi.encodePacked("open")),
            "Flight status is closed"
        );
        _;
    }

    // Deposit to Contract
    function deposit() external payable {
        balanceAddress[msg.sender] += msg.value;
    }

    // Check contract balance
    function contractBalance() public view returns (uint256) {
        return address(this).balance;
    }

    // User to withdraw balance
    function balanceWithdraw(uint256 _amount) public {
        uint256 amountInWei = _amount * 1 ether;
        require(
            balanceAddress[msg.sender] >= amountInWei,
            "Insufficient funds"
        );
        payable(msg.sender).transfer(amountInWei);
        balanceAddress[msg.sender] -= amountInWei;
    }

    // Withdraw all funds (only admin)
    function withdrawAllFunds() public onlyAdmin {
        payable(admin).transfer(contractBalance());
        balanceAddress[msg.sender] = 0;
    }
}

// Flight booking contract....
contract FlightBooking is baseContract {
    function FlightBookings(
        string memory fareTypes,
        string memory LeavingOn,
        string memory returningOn,
        string memory toWhere,
        string memory itinerary,
        uint256 numberOfPassangers
    ) public checkFlightStatus {
        require(
            balanceAddress[msg.sender] >= 2 ether,
            "Insufficient funds. Please deposit 2 eth to wallet."
        );
        string memory airlineNumber = Strings.toString(block.timestamp); // Convert string to number
        // Concatenating 2 strings
        string memory joinedFlightNumber = string.concat("AC", airlineNumber);
        flightBookingStruct memory booking = flightBookingStruct(
            address(msg.sender),
            joinedFlightNumber,
            uint256(1 ether),
            flightStatus,
            incrementingSeatNumber,
            fareTypes,
            LeavingOn,
            returningOn,
            toWhere,
            itinerary,
            numberOfPassangers
        );
        flightBookingAddresses[msg.sender] = booking;
        incrementingSeatNumber + 1; // Incrementing the seaat number
        balanceAddress[msg.sender] -= 2 ether; // Deducting funds (2 ether)
    }
}

// Hotel booking contract
contract HotelBooking is FlightBooking {
    function HotelBookings(
        string memory goingTo,
        uint256 numberOfGuest,
        uint256 numberOfRooms,
        string memory purposeOfTraveling,
        string memory checkIn,
        string memory checkOut
    ) public {
        // Check insufficnent funds
        require(
            balanceAddress[msg.sender] >= 1 ether,
            "Insufficient funds, please deposit at least 1 eth to wallet."
        );
        uint256 bookingNumber = block.timestamp;
        HotelBookingStruct memory booking = HotelBookingStruct(
            address(msg.sender),
            bookingNumber,
            checkIn,
            checkOut,
            goingTo,
            numberOfGuest,
            numberOfRooms,
            purposeOfTraveling,
            uint256(1 ether)
        );
        hotelBookingAddress[msg.sender] = booking;
        balanceAddress[msg.sender] -= 1 ether; // Deducting funds (1 ether)
    }
}

// Deploying contract that contains the booking for light  and hotel
contract BookingContract is HotelBooking {
    function test() public pure returns (string memory) {
        return "Everything is alright";
    }
}
From the code above, you will notice there is three smart contracts in it and contract inherits contract, The reason why it’s like that is just to make the code more understandable and we just felt like utilzing the contract inheritance method. I’ll be breaking down the code for you to understand better The code includes three main contracts: baseContract, FlightBooking, HotelBooking, and a final contract BookingContract that deploys and combines the functionality of the previous contracts.
Here’s a breakdown of the code:
BaseContract: This is the base contract that contains common functionalities and data structures for flight and hotel bookings. It includes the following:
- Variables:
-admin: Stores the address of the contract admin.
-incrementingSeatNumber: Tracks the seat number for flight bookings.
-incrementingRoomNUmber: Tracks the room number for hotel bookings.
-flightStatus: Represents the status of the flight (open or closed).- Structs:
flightBookingStruct: Represents a flight booking with various attributes like booking owner address, flight number, payment amount, flight status, seat number, fare types, departure and return dates, destination, itinerary, and number of passengers.HotelBookingStruct: Represents a hotel booking with attributes like booking owner address, booking number, check-in and check-out dates, destination, number of guests, number of rooms, purpose of traveling, and payment amount.
- Mappings:
flightBookingAddresses: Maps the booking owner address to their flight booking details.hotelBookingAddress: Maps the booking owner address to their hotel booking details.balanceAddress: Maps the user address to their balance (funds deposited in the contract).
- Modifiers:
onlyAdmin: Restricts access to functions only to the contract admin. and we’ll be calling this in the process of withdrawing all funds from the contract.checkFlightStatus: Ensures that the flight status is open before executing certain functions.
- Functions:
constructor: Initializes the contract and sets the admin address to the contract deployer.deposit: Allows users to deposit funds to their balance in the contract.contractBalance: Returns the balance (in wei) of the contract.balanceWithdraw: Allows users to withdraw funds from their balance.withdrawAllFunds: Allows the admin to withdraw all funds from the contract.
- Structs:
FlightBooking: This contract extends **baseContract** and adds flight booking-specific functionalities. It includes the following:
- Function:
FlightBookings: Allows users to book a flight by providing fare types, departure and return dates, destination, itinerary, and number of passengers. It checks the flight status, verifies sufficient funds in the user’s balance, generates a unique flight number, creates a newflightBookingStructwith the provided details, assigns the booking to the user’s address in the mapping, increments the seat number, and deducts 2 ether from the user’s balance. Remember this function will be called/accessed from the front-end using web3.js
HotelBooking: This contract extends FlightBooking and adds hotel booking-specific functionalities. It includes the following:
- Function:
HotelBookings: Allows users to book a hotel by providing the destination, number of guests, number of rooms, purpose of traveling, check-in, and check-out dates. It verifies sufficient funds in the user’s balance, generates a unique booking number, creates a newHotelBookingStructwith the provided details, assigns the booking to the user’s address in the mapping, and deducts 1 ether from the user’s balance.
BookingContract: This contract extends HotelBooking and serves as the deployment contract for the booking system. It includes a test function test() that returns a test message. Please note that during the deployment process, we’ll be deploying this BookingContract in the Remix IDE meaning we will be choosing it in the list of dropdown.
The code provides a basic structure for a booking system, allowing users to book flights and hotels while managing balances and contract administration.
Testing and Deploying the Smart Contract Using Remix
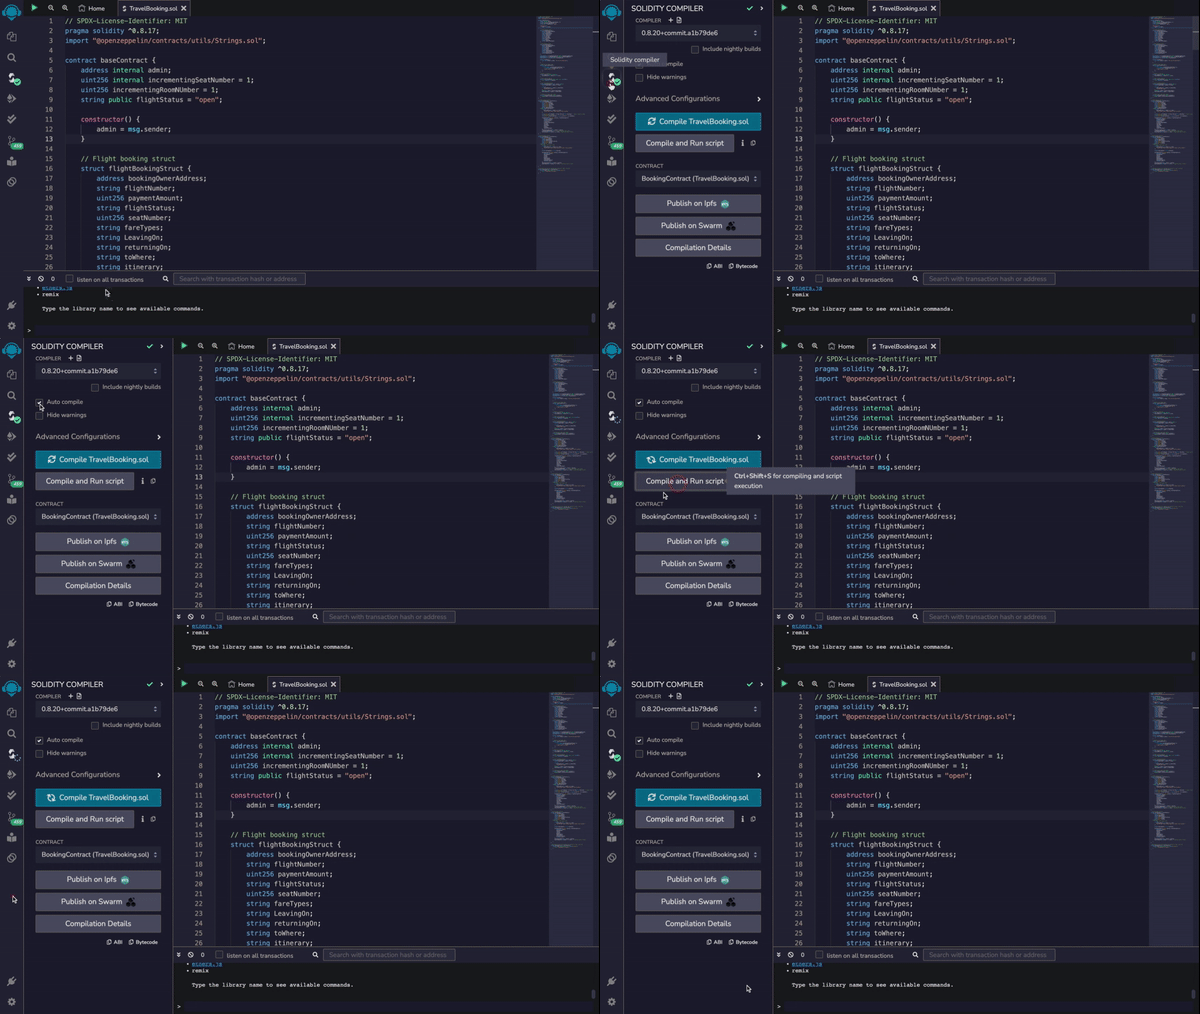
We will utilize Remix to assess the contract we created. All you need to do is copy and paste the code into Remix and perform the compilation. In the left sidebar of Remix, you can opt for auto-compilation. The accompanying animation demonstrates the process of compiling your Solidity code.
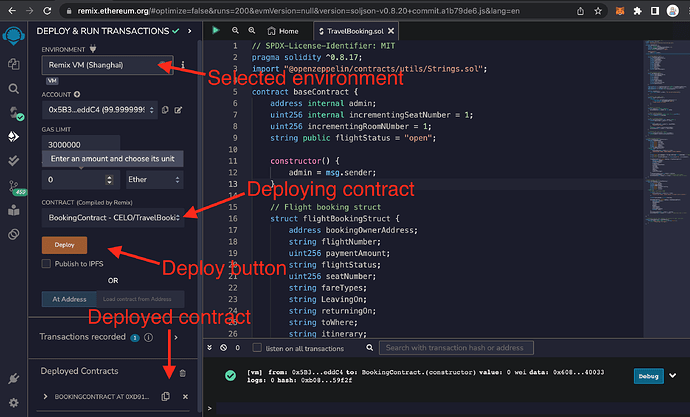
Once you have compiled the code, you can proceed to deploy it using the Remix platform. During the deployment process, we will deposit free ETH into the provided address in Remix. To accomplish this, you should first choose the network environment, then select BookingContract, and finally click on the deploy button. After clicking the deploy button, you will be able to view the deployed contract as demonstrated below.
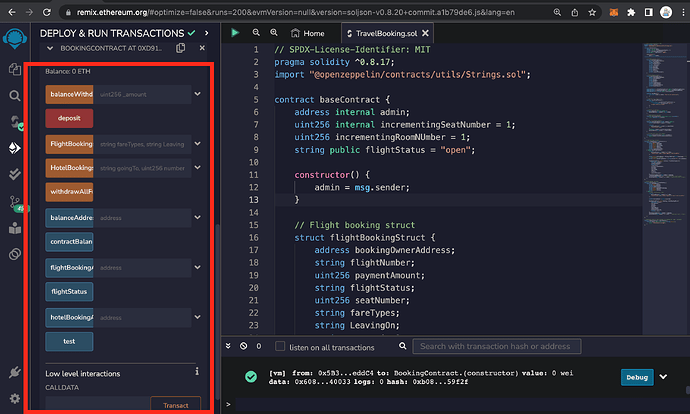
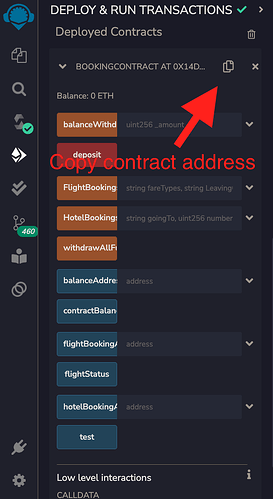
When you open the contract, you can use the copy icon to copy the contract address to your clipboard. However, please refrain from copying it at this moment. Instead, expand the contract by clicking the “greater than” icons. Once you have expanded the deployed contract, you will be able to view the output displayed below.
After successfully deploying the contract, we can proceed to make a flight reservation by utilizing the FlightBookings function. However, it is necessary to deposit funds into the contract’s wallet beforehand. To complete the deposit process, please refer to the instructions provided in the accompanying video.
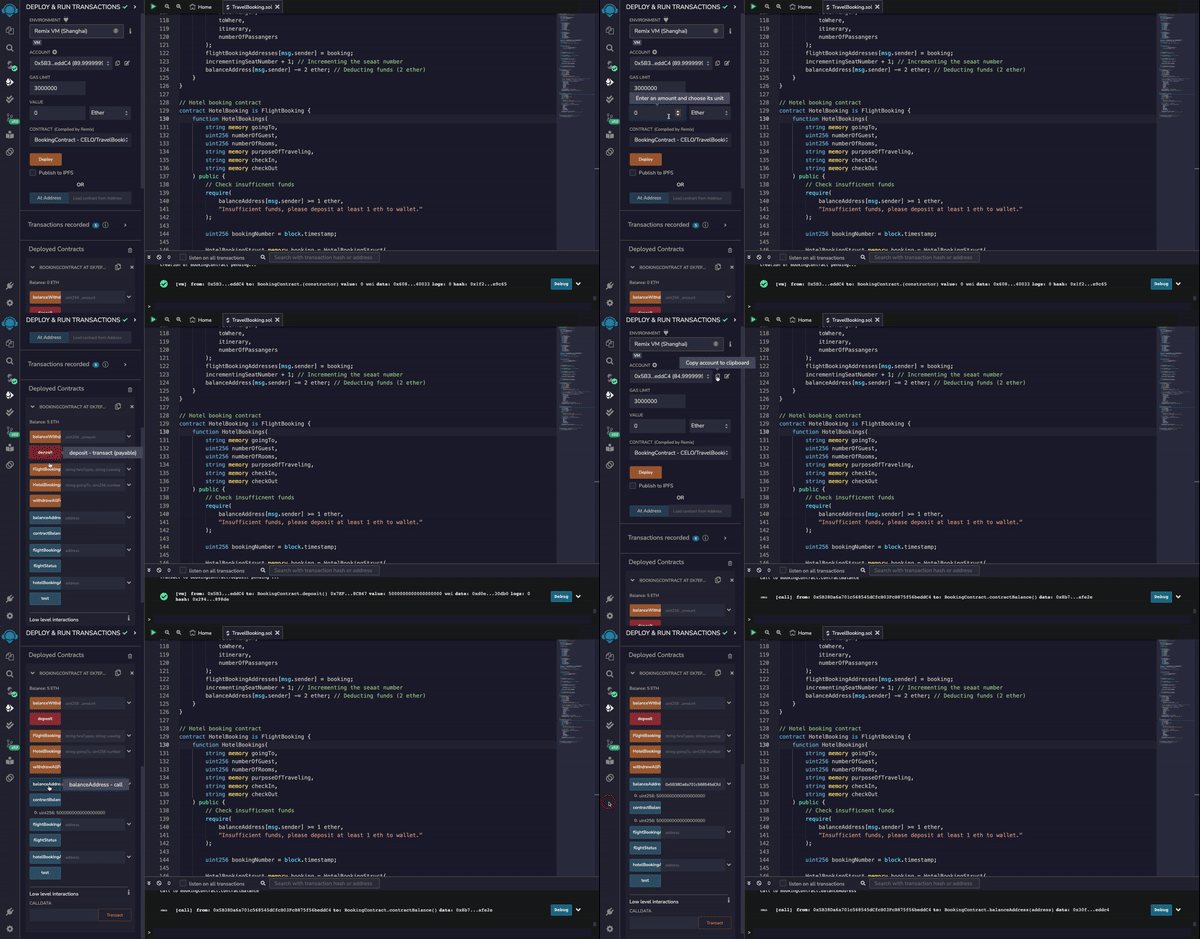
Based on the output provided above, we transferred 5 ETH to the wallet and verified the balance of the contract. Additionally, we utilized the balanceAddress function to examine our balance. This function associates the address with a uint256 value, which increases when a user makes a deposit and decreases when a user reserves a flight or hotel.
Booking the flight in Remix
In this part, our task is to reserve a flight within the Remix IDE using the active contract. To do this, we need to open the FlightBookings function and provide all the necessary details for the flight reservation, as demonstrated below. Once we have filled in the information, we can book the flight by clicking the “transact” button. It’s important to remember that if we haven’t deposited funds into the contract as previously discussed, an error indicating insufficient funds will occur. The following output provides a visual representation of the process for booking a flight directly through Remix.
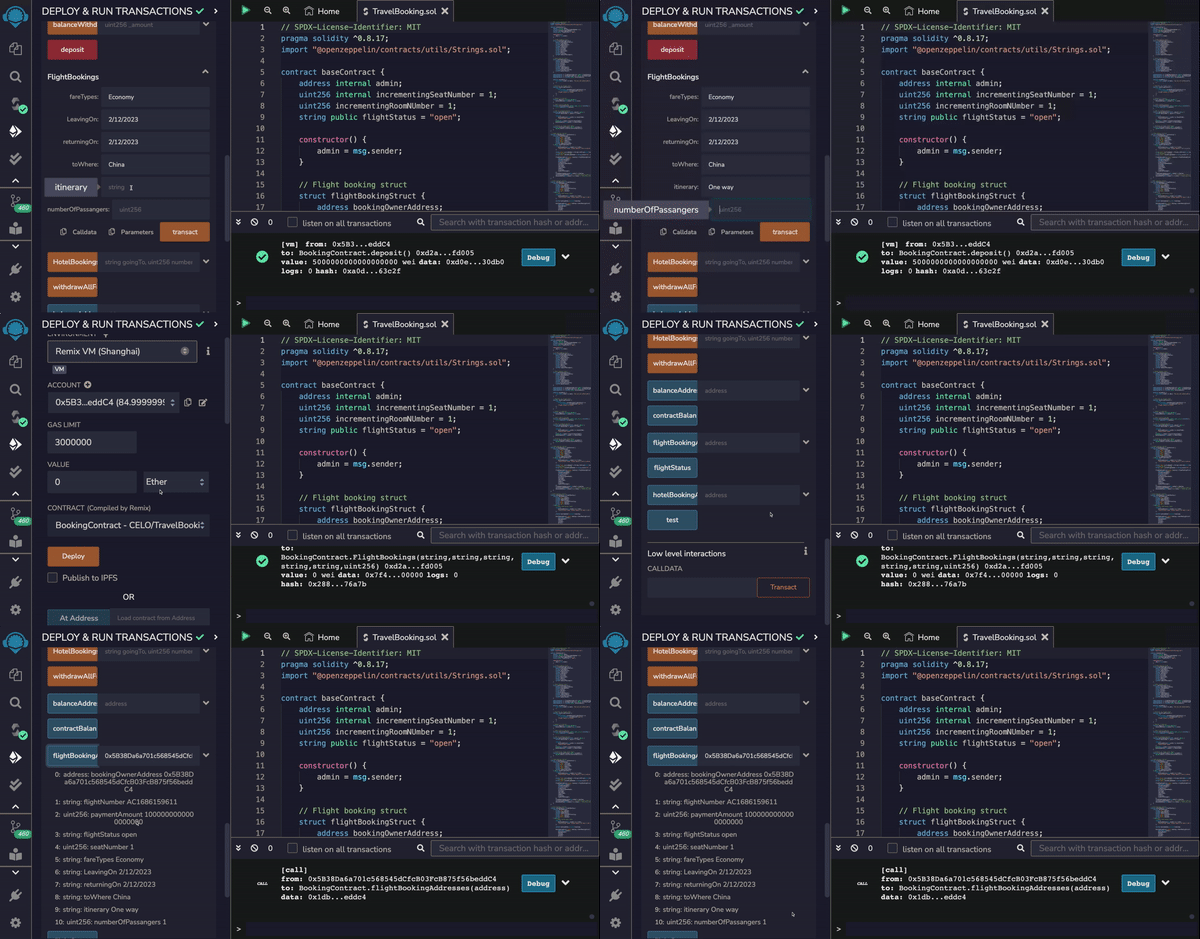
Based on the information displayed above, we copied the address that was used to deploy the contract, which serves as the admin address as defined in the code. We then pasted this address into a function called “flightBookingAddresses” to retrieve the booking data.
Now that you have successfully booked a flight, we need to consider how to incorporate it into the front end of our decentralized application (Dapp). This involves organizing the necessary files in the designated directory folder. As for the other functions you may have noticed in Remix, you can explore them yourself. For example, you can attempt to book a hotel and view the booked hotel by copying and pasting the address you used for the hotel booking into a function called “hotelBookingAddress.” This will enable you to access all the data related to the hotel bookings. Please note that this process is similar to what we previously covered when we booked a flight.
Setting up the Development Environment
For the project, we will use React.js and set up webpack. Yarn will be used to install the necessary packages in the project directory, so please make sure you have node.js installed on your computer. In this article, we will make use of different packages and incorporate them into the project. To install React, please run the provided code in your project terminal.
yarn create react-app my-app
Once you have successfully installed React, you can execute the code provided below to install both React-Celo and ContractKit.
yarn add @celo/contractkit @celo/react-celo
After completing our project, it is necessary to install webpack to effectively use react-celo and contractKit without encountering any errors, as this is a common practice. To install webpack, execute the provided code in your terminal.
yarn add --dev webpack
Once you have successfully installed webpack, you can easily create a file called webpack.config.js in your project directory. Copy and paste the provided webpack code into this file.
const path = require("path");
module.exports = {
  entry: "./src/index.js",
  output: {
    filename: "main.js",
    path: path.resolve(__dirname, "build"),
  },
  node: {
    net: "empty",
  },
};
Now, we will modify the webpack configuration of the React app by including additional packages. These newly installed packages will be compatible with webpack, which will help prevent our code from crashing when using react-celo and celo contractkit. To implement this, please copy the code provided below and paste it into your terminal.
yarn add --dev react-app-rewired crypto-browserify stream-browserify assert stream-http https-browserify os-browserify url buffer process
Once the installation of the packages is complete, you should proceed to generate a file called config-overrides.js. This file will contain specific configuration codes aimed at modifying the webpack build. The code’s purpose is to supplement node.js modules with fallback options in case they are not accessible in the browser environment. Additionally, a plugin is included to facilitate the import and provision of required modules during the building phase. By doing so, compatibility is ensured and certain modules can be utilized in a browser-based setting when employing webpack. To implement this, you can easily copy the code provided below and insert it into the config-overrides.js file.
const webpack = require("webpack");
module.exports = function override(config) {
  const fallback = config.resolve.fallback || {};
  Object.assign(fallback, {
    crypto: require.resolve("crypto-browserify"),
    stream: require.resolve("stream-browserify"),
    assert: require.resolve("assert"),
    http: require.resolve("stream-http"),
    https: require.resolve("https-browserify"),
    os: require.resolve("os-browserify"),
    url: require.resolve("url"),
  });
  config.resolve.fallback = fallback;
  config.plugins = (config.plugins || []).concat([
    new webpack.ProvidePlugin({
      process: "process/browser",
      Buffer: ["buffer", "Buffer"],
    }),
  ]);
  return config;
};
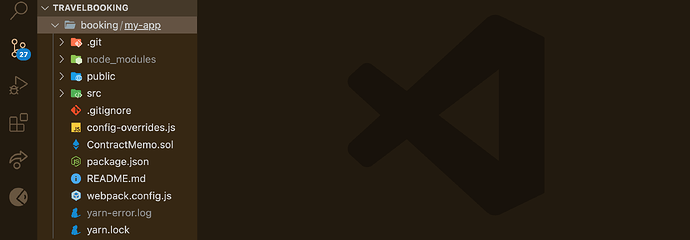
Once you have completed the steps described above, your project folder will resemble mine, as depicted in the image provided.
If you find the setup described in this section to be complicated, don’t worry. I have a completed project that includes the configuration I uploaded to GitHub. In the following section, we will discuss this in more detail.
Implementing the Frontend with React.js
In this portion, we will focus on the frontend aspect of the Travel Booking DApp. The project folder and the front end are already set up, including the user interface for hotel and flight booking. Instead of starting from scratch, I have already completed all the necessary coding for you. Your task is to clone the GitHub repository by following the provided link. The following line of code will assist you in cloning the repository.
git clone https://github.com/GabrielDelight/decentralized-travel-booking-dapp.git
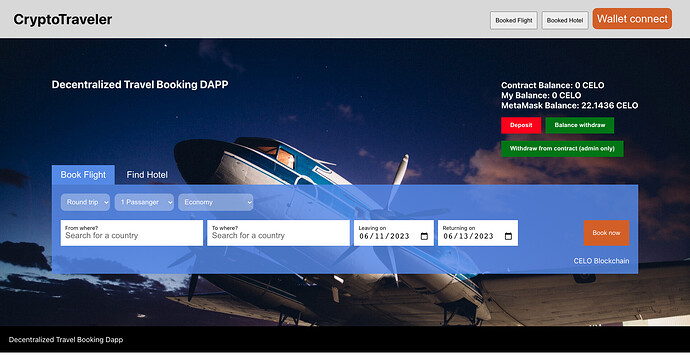
Once you have cloned the repository, proceed by executing “yarn install” in the terminal of your project folder to install the necessary packages. Once the packages have been successfully installed, initiate the application by running “yarn start”. This will start the application, and you will see the following output in your web browser.
Explaining the Installed Packages
In this section, I will discuss the packages that have been installed and are being used in the project. I will provide a list of these packages and explain in detail how they are utilized to help you gain a better understanding. The following is a compilation of packages employed for the DApp:
- Celo/react-celo: This is a React library designed specifically for Celo DApp development.
- Celo/contractkit: These tools are utilized to interact with Celo smart contracts.
- Sweetalert2: It is a JavaScript library that enables the customization of pop-up modals.
- Web3.js: This JavaScript library allows for interaction with the Ethereum blockchain.
- Bignumber.js: This library facilitates precise arithmetic operations involving large or decimal numbers.
Implementing Wallet Connect
In the index.js file, we will utilize react-celo. We will wrap the App.js component with the <CeloProvider> component, which establishes the connection between the decentralized application (DApp) and the Celo blockchain. This component accepts various configuration options as props.
Inside the <CeloProvider> component, the connectModal prop is used to customize the modal for connecting the wallet. The title prop is set to “Connect your Wallet” as a React element.
The networks prop specifies the available Celo networks, with the Alfajores network included in this case. Additionally, the network prop is used to define the network configuration for the DApp. It includes the name, rpcUrl (the URL for the Celo node), graphQl (the URL for the GraphQL endpoint), explorer (the URL for the block explorer), and chainId (the ID of the Celo network).
The code for index.js is provided below.
import React from "react";
import ReactDOM from "react-dom/client";
import "./index.css";
import App from "./App";
import reportWebVitals from "./reportWebVitals";
import { CeloProvider, Alfajores, NetworkNames } from "@celo/react-celo";
import "@celo/react-celo/lib/styles.css";
const root = ReactDOM.createRoot(document.getElementById("root"));
root.render(
  <React.StrictMode>
    <CeloProvider
      dapp
      connectModal={{
        // This options changes the title of the modal and can be either a string or a react element
        title: <span>Connect your Wallet</span>,
        providersOptions: {
          // This option toggles on and off the searchbar
          searchable: true,
        },
      }}
      networks={[Alfajores]}
      network={{
        name: NetworkNames.Alfajores,
        rpcUrl: "https://alfajores-forno.celo-testnet.org",
        graphQl: "https://alfajores-blockscout.celo-testnet.org/graphiql",
        explorer: "https://alfajores-blockscout.celo-testnet.org",
        chainId: 44787,
      }}
    >
      <App />
    </CeloProvider>
  </React.StrictMode>
);
reportWebVitals();
To initiate the invocation of the wallet connect, you just need to employ the useCelo hook provided by the react-celo library. Initially, you have to import the hook using the following code snippet:
import { useCelo } from "@celo/react-celo";
Once the hook is imported, within the Header component, the useCelo hook is utilized to fetch the connect function from the Celo context. This connect function is in charge of initiating the connection to the Celo wallet belonging to the user. Here is the useCelo hook that we invoked:
const { connect } = useCelo();
Finally, all you have to do is invoke the connect function within the wallet connect button handler.
<button className={classes.wallet_connect} onClick={connect}>
 Wallet connect
</button>;
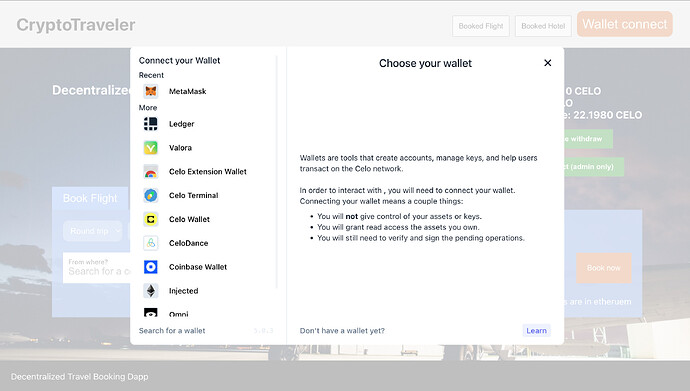
When you click the wallet connect button, you will be presented with the following output. The image displays a modal that allows you to establish a connection with your wallet, which includes MetaMask.
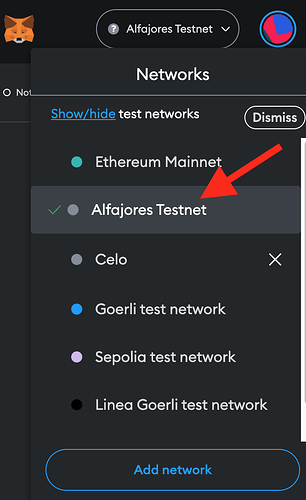
By selecting MetaMask, the Alfojores Testnet will be seamlessly integrated into your wallet. To provide funds, please copy your wallet address and proceed to https://faucet.celo.org/alfajores in order to fund your account.
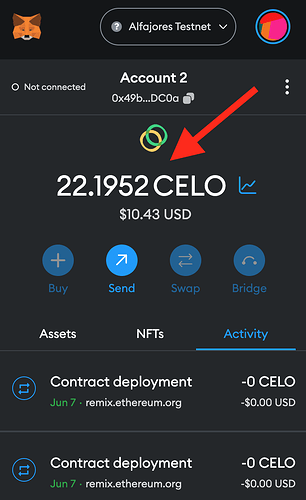
Once the wallet is linked and the react-celo integration is implemented, our wallet can now engage with the DApp. By referring to the accompanying image, you can observe the current balance of the wallet. Later in this article, we will delve into the process of obtaining the wallet balance in the ContractHook.js file located within the Hook folder.
It is important to understand that the balance displayed in MetaMask aligns with the balance available in our MetaMask wallet, as depicted below.
Deploying Solidity Smart Contract to Celo Blockchain via Remix.
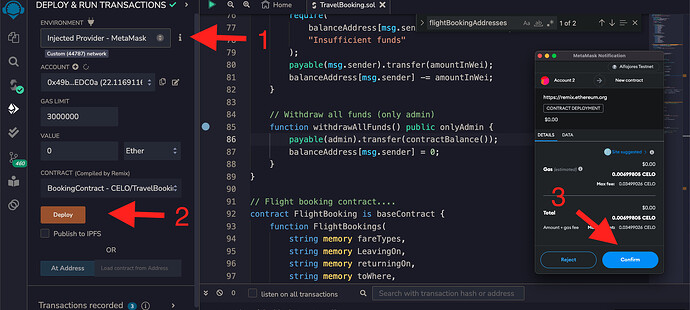
After preparing our MetaMask wallet and acquiring CELO, we can proceed with deploying the smart contract onto the Celo Blockchain. This process is straightforward. Ensure that your MetaMask is set to the Alfajores Testnet, then choose the Injected Provider option in the “Deploy and run transaction” section of Remix. The accompanying image visually depicts the steps involved in deploying the contract.
After you click “confirm” in MetaMask, the smart contract will be deployed to the Celo Blockchain. You will then receive the displayed output below, which shows the deployed contract for the Travel booking function discussed earlier in this article.
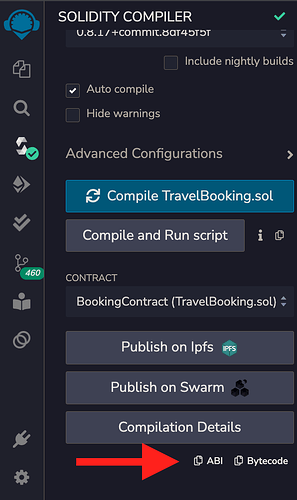
To proceed with the next section of the article, make sure to securely save the wallet address by copying it. This address is essential for connecting our contract to the front-end Dapp. Furthermore, it is crucial to copy the Contract Application Binary Interface (ABI) array as well. This array assists the Dapp in accessing the functions and variables within the solidity code, ensuring seamless integration between the front-end and solidity code during the implementation of the travel booking DApp. Refer to the image below for the location of the ABI array.
Exploring the Contract Hook
In this part, we will examine the Contract Hook component, which is where we integrated the contract instance. We made use of contractKit, Web3.js, as well as the ABI array and contract address that we saved in a secure note. When you open the ContractHook component, you will come across code similar to this:
let contractInstance = new kit.web3.eth.Contract(
  abiData,
  "0x6a462FFAf89fE9161A10dB3fe04E81850Ff94267"
);
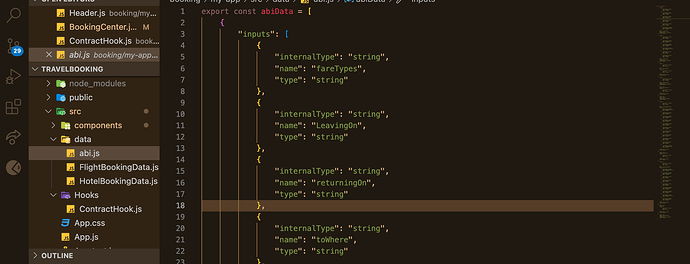
All you need to do is copy and paste your deployed contract into the designated location. Additionally, there is a folder called “Data” where you will find a file named “abi.js”. You just need to copy and paste the contents of the ABI array into that file, following the format provided below.
In the Contract Hook file, there will be numerous codes present. However, I will provide comprehensive explanations for the code that follows. You need to focus on this particular section to enhance your understanding.
Code:
import React, { useState, useEffect } from "react";
import { useCelo } from "@celo/react-celo";
import Web3 from "web3";
import { newKitFromWeb3 } from "@celo/contractkit";
import { abiData } from "../data/abi";
import BigNumber from "bignumber.js";
import Swal from "sweetalert2";
const ContractHook = () => {
  const { address } = useCelo();
  const [depositBalance, setDepositBalance] = useState("");
  const [contractBalance, setContractBalance] = useState("");
  const [flightStatus, setFlightStatus] = useState("");
  const [metamaskWallet, setMetamaskWallet] = useState("");
  const web3 = new Web3("https://alfajores-forno.celo-testnet.org");
  const kit = newKitFromWeb3(web3);
  kit.addAccount(
    "ec4aa7efc0f434dc888bbafd1655d0837afa73d706b5e9ae6e266bdf2b9ce9e5"
  );
  let contractInstance = new kit.web3.eth.Contract(
    abiData,
    "0x6a462FFAf89fE9161A10dB3fe04E81850Ff94267"
  );
  useEffect(() => {
    async function isConnectedToContract() {
      try {
        const result = await contractInstance.methods.test().call();
        // 1. Get Flight status
        const flightStatusVar = await contractInstance.methods
          .flightStatus()
          .call();
        setFlightStatus(flightStatusVar);
        // Get metamask balance
        let balance = await kit.web3.eth.getBalance(address);
        setMetamaskWallet(new BigNumber(balance).dividedBy(1e18).toString());
        const contractBalance = await contractInstance.methods
          .contractBalance()
          .call();
        setContractBalance(
          new BigNumber(contractBalance).dividedBy(1e18).toString()
        );
        // Get deposit amount
        const depositBalance = await contractInstance.methods
          .balanceAddress(address)
          .call();
        setDepositBalance(
          new BigNumber(depositBalance).dividedBy(1e18).toString()
        );
      } catch (error) {
        console.log(error);
      }
    }
    isConnectedToContract();
    let intervalId = setInterval(() => {
      isConnectedToContract();
    }, 2000);
    return () => clearInterval(intervalId);
  }, []);
  const onWithdrawAllFunction = () => {
    contractInstance.methods
      .withdrawAllFunds()
      .send({
        from: address,
        gas: 3000000,
      })
      .on("transactionHash", (hash) => {
        console.log("Transaction hash:", hash);
      })
      .on("receipt", (receipt) => {
        console.log("Receipt:", receipt);
        Swal.fire(
          "Withdrawal successful!",
          `You have successfully transferred all funds from the contract wallet to your booking address.        .`,
          "success"
        );
      })
      .on("error", (error) => {
        console.error("Error: occured", error);
        Swal.fire(
          "Transaction failed!",
          `Attempt to withdraw from booking wallet balance failed in the transaction.`,
          "error"
        );
      });
  };
  return {
    contractInstance,
    metamaskWallet,
    flightStatus,
    contractBalance,
    depositBalance,
    kit,
    address,
    onWithdrawAllFunction,
  };
};
export default ContractHook;
To access the code mentioned above in the project folder, you can simply go to the Hook folder and locate the file named “ContractHook.js.” This file serves as a custom hook that plays an important role in integrating Web3 into our project. Inside this hook, we create an instance of web3 and use hooks like useState and useEffect to manage state and handle side effects. The component interacts with a smart contract deployed on the Celo blockchain.
In more detail, the component initializes instances of Web3 and ContractKit, establishes a connection to a contract using its ABI and address, and retrieves data from the contract. It manages state variables for the deposit balance, contract balance, flight status, and Metamask wallet balance.
Additionally, the component provides a function to withdraw all funds from the contract wallet to the user’s booking address. It sets up an interval to regularly update the contract data.
Finally, the component returns an object that includes the contract instance, Metamask wallet balance, flight status, contract balance, deposit balance, ContractKit instance, user address, and the withdrawal function. This object can be used by other components within the application.
Regarding the provided code, whenever we want to perform a transaction, we can conveniently import the contract hook file and use any of its functions. In our application, we will be depositing, withdrawing, and withdrawing all funds from the wallet, and we just need to utilize the contract hook file and its functions.
Depositing to the Contract
If an attempt is made to perform a transaction or book a flight without having deposited to the smart contract, an error message indicating insufficient funds will be displayed. In this particular section, we will proceed to deposit funds into the smart contract, and the user interface (UI) has already been created for this purpose. All you need to do is fund your MetaMask Alfajores test net account and make a deposit. The visual representation below demonstrates how to carry out a deposit, while the code responsible for integrating this functionality can be found beneath the video representation.
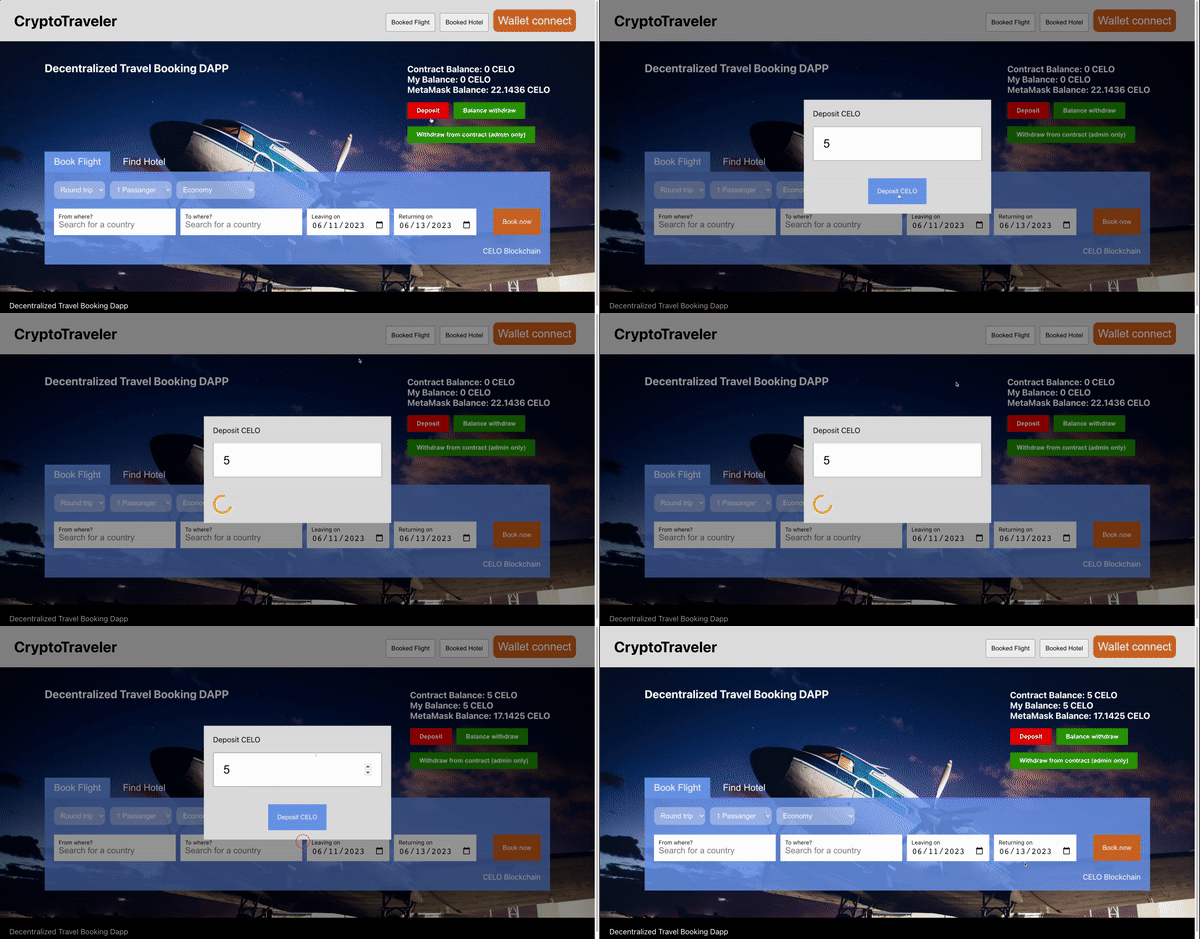
In the aforementioned result, it can be observed that our balance and the initial contract balance were both 0 CELO. However, we subsequently funded the contract with an impressive amount of 5 CELO. Furthermore, we witnessed the successful update of our contract balance. Now, let’s delve into the code responsible for these actions.
Solidity:
The following code excerpt introduces a function named “deposit” that enables users to transfer CELO to the contract. The CELO sent by the user is appended to the balance associated with their address within the contract.
// Deposit to Contract
function deposit() external payable {
   balanceAddress[msg.sender] += msg.value;
}
ReactJs:
Inside the component folder within the project directory, you can find a deposit file. Just open it to view the output displayed below:
import React, { useState } from "react";
import ContractHook from "../../Hooks/ContractHook";
import classes from "./Deposit.module.css";
import Swal from "sweetalert2";
import Loading from "../LoadingIcon/Loading";
const Deposit = (props) => {
  const [amount, setAmount] = useState("0");
  const [isLoading, setIsLoading] = useState(false);
  const { contractInstance, kit, address } = ContractHook();
  const onChnageHandler = (el) => {
    setAmount(el.target.value);
  };
  const onSubmitHandler = () => {
    if (amount.length < 1) return alert("Please input a value");
    const confirm = window.confirm(
      `Are you sure you want to deposit ${amount} CELO`
    );
    if (confirm) {
      setIsLoading(true);
      contractInstance.methods
        .deposit()
        .send({
          from: address,
          value: kit.web3.utils.toWei(amount, "ether"),
          gas: 3000000,
        })
        .on("transactionHash", (hash) => {
          console.log("Transaction hash:", hash);
        })
        .on("receipt", (receipt) => {
          console.log("Receipt:", receipt);
          Swal.fire(
            "Deposit successful!",
            `You were successful in adding ${amount} CELO to your booking wallet.`,
            "success"
          );
          setIsLoading(false);
          setTimeout(() => {
            props.closeModal();
          }, 3000);
        })
        .on("error", (error) => {
          console.error("Error: occured", error);
          Swal.fire(
            "Transaction failed!",
            `Attempt to deposit to the booking wallet failed in the transaction.`,
            "error"
          );
          setIsLoading(false);
        });
    }
  };
  // Closing the modal
  const onCloseModal = (el) => {
    if (el.target.id === "parent-modal") {
      props.closeModal();
    }
  };
  return (
    <div className={classes.container} onClick={onCloseModal} id="parent-modal">
      <div className={classes.wrapper}>
        <p>Deposit CELO </p>
        <br></br>
        <div>
          <input
            onChange={onChnageHandler}
            type={"number"}
            placeholder="0.00 CELO"
          />
          <br />
          <br />
          <br />
          {!isLoading ? (
            <button onClick={onSubmitHandler}>Deposit CELO</button>
          ) : (
            <Loading />
          )}
        </div>
      </div>
    </div>
  );
};
export default Deposit;
The code introduces a React functional component named Deposit, which is responsible for displaying a modal for depositing CELO, a type of cryptocurrency, into a smart contract. The component employs the useState hook to manage state variables and imports the ContractHook component, which grants access to the contract instance, ContractKit instance, and user address. Within the component, a modal is rendered, featuring an input field to input the deposit amount and a button labeled “Deposit CELO.” Additionally, it handles the loading state using an isLoading variable and exhibits a loading icon while processing the deposit. Upon clicking the “Deposit CELO” button, the component validates the entered amount, prompts the user for confirmation, and initiates the deposit transaction to the contract using the contractInstance and kit objects. It exhibits success or error messages employing Swal and closes the modal after a brief delay. Moreover, the component encompasses a function to handle the closure of the modal when clicking outside its content. Lastly, the component is exported as the default export of the module, enabling its utilization in other sections of the application. In the subsequent section, we will use the funds deposited into the contract to book a flight.
Booking a Flight
In this segment, we will make a reservation for a flight. To complete the transaction, we need 2 CELO, and we currently have a balance of approximately 5 CELO. Once the booking is done, we will have 3 CELO remaining in our balance, but the contract balance will still be 5 CELO. This is because the deducted amount will come from the balanceAddress specified in the Smart contract. Now, let’s proceed with the flight booking and examine the code that facilitates this process. You can watch the video below for a demonstration of how to book a flight.
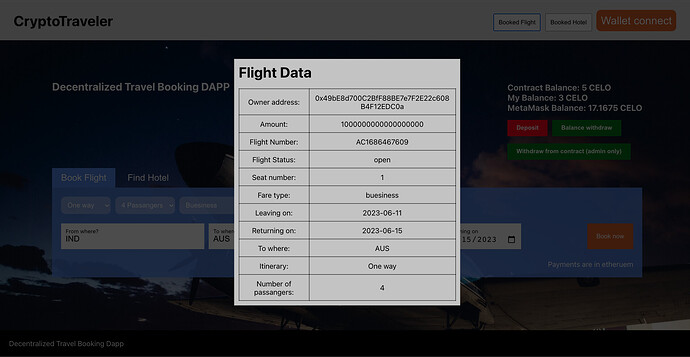
The provided demonstration shows how the flight booking integration works, and it is straightforward. By making a booking, I had 2 CELO deducted from my account, leaving me with a remaining balance of 3 CELO. The main contract balance remains unchanged at 5 CELO. Finally, if you click on the “Booked Flight” button located in the top header section of the code, you will be able to view the details of your recently booked flight. The image below displays an example of the flight data that was booked.
The code for displaying the Flight data that has been booked by the mage mentioned above can be located in the “BookedData” folder within the component folder.
const [flightBookingData, setFlightBookingData] = useState({});
const { contractInstance, address } = ContractHook();
// Get Flight Booking Data
useEffect(() => {
  contractInstance.methods
    .flightBookingAddresses(address)
    .call()
    .then((data) => {
      setFlightBookingData(data);
    })
    .catch((error) => {
      console.log(error);
    });
}, []);
The provided code retrieves flight booking information from a smart contract by utilizing the contractInstance and address acquired from the ContractHook custom hook. It then modifies the flightBookingData state variable by incorporating the obtained data.
The Flight Booking Code
In the preceding section, we committed to elucidating the code related to the process of booking a flight. Presented below is the actual code utilized for flight booking, and it would be beneficial for you to carefully examine it as I proceed to explain its functionality.
Solidity:
function FlightBookings(
    string memory fareTypes,
    string memory LeavingOn,
    string memory returningOn,
    string memory toWhere,
    string memory itinerary,
    uint256 numberOfPassangers
) public checkFlightStatus {
    require(
        balanceAddress[msg.sender] >= 2 ether,
        "Insufficient funds. Please deposit 2 eth to wallet."
    );
    string memory airlineNumber = Strings.toString(block.timestamp); // Convert string to number
    // Concatenating 2 strings
    string memory joinedFlightNumber = string.concat("AC", airlineNumber);
    flightBookingStruct memory booking = flightBookingStruct(
        address(msg.sender),
        joinedFlightNumber,
        uint256(1 ether),
        flightStatus,
        incrementingSeatNumber,
        fareTypes,
        LeavingOn,
        returningOn,
        toWhere,
        itinerary,
        numberOfPassangers
    );
    flightBookingAddresses[msg.sender] = booking;
    incrementingSeatNumber + 1; // Incrementing the seaat number
    balanceAddress[msg.sender] -= 2 ether; // Deducting funds (2 ether)
}
The piece of code is a function named FlightBookings that accepts various parameters like fare types, dates, destination, itinerary, and passenger count. It carries out several checks and computations, including verifying the flight status, confirming if the sender has enough funds (2 ether), converting a timestamp to a string, combining strings, constructing a flight booking structure, assigning the booking to the sender’s address, increasing the seat number, and subtracting the funds from the sender’s balance.
ReactJs:
import React, { useState } from "react";
import ContractHook from "../../Hooks/ContractHook";
import classes from "./BookingCenter.module.css";
import CustomInput from "./CustomInput";
import Swal from "sweetalert2";
import Loading from "../LoadingIcon/Loading";
const FlightBooking = () => {
  const [formInput, setFormInput] = useState({
    fromWhere: "",
    toWhere: "",
    forwardTrip: "",
    numberOfPassangers: 1,
    LeavingOn: new Date().toISOString().substr(0, 10),
    returningOn: new Date(new Date().setDate(new Date().getDate() + 2))
      .toISOString()
      .slice(0, 10),
    fareType: "Economy",
    itinerary: "One way",
  });
  const [isLoading, setIsLoading] = useState(false);

  const onChangeHandler = (e) => {
    setFormInput((prevState) => {
      return {
        ...prevState,
        [e.target.name]: e.target.value,
      };
    });
  };
  const { contractInstance, address, depositBalance } = ContractHook();
  const onPayHandler = () => {
    if (depositBalance < 2) {
      return Swal.fire(
        "Insufficient funds!",
        `Insufficient funds please fund your account and try again later.`,
        "error"
      );
    }
    setIsLoading(true);
    contractInstance.methods
      .FlightBookings(
        formInput.fareType,
        formInput.LeavingOn,
        formInput.returningOn,
        formInput.toWhere,
        formInput.itinerary,
        parseInt(formInput.numberOfPassangers)
      )
      .send({
        from: address,
        gas: 3000000,
      })
      .on("transactionHash", (hash) => {
        console.log("Transaction hash:", hash);
      })
      .on("receipt", (receipt) => {
        console.log("Receipt:", receipt);
        Swal.fire(
          "Booking successful!",
          `You were successful in booking a fligt.`,
          "success"
        );
        setIsLoading(false);
      })
      .on("error", (error) => {
        console.error("Error: occured", error);
        Swal.fire(
          "Transaction failed!",
          `Attempt to withdraw from booking wallet balance failed in the transaction.`,
          "error"
        );
        setIsLoading(false);
      });
  };
  return (
    <div className={classes.flight_booking_wrapper}>
      <div className={classes.open_tab}>
        <select name={"itinerary"} onChange={onChangeHandler}>
          <option value="Round trip">Round trip</option>
          <option value="One way">One way</option>
        </select>
        {/* Numbers of passanger */}
        <select name={"numberOfPassangers"} onChange={onChangeHandler}>
          <option value="1">1 Passanger</option>
          <option value="2">2 Passangers</option>
          <option value="3">3 Passangers</option>
          <option value="4">4 Passangers</option>
          <option value="5">5 Passangers</option>
          <option value="6">6 Passangers</option>
          <option value="7">7 Passangers</option>
          <option value="8">8 Passangers</option>
        </select>
        <select name={"fareType"} onChange={onChangeHandler}>
          <option value="economy">Economy</option>
          <option value="premium-economy">Premium Economy </option>
          <option value="buesiness">Buesiness</option>
          <option value="first-class">First class</option>
        </select>
      </div>
      <div className={classes.custom_input_container}>
        <CustomInput className={classes.input_text} label={"From where?"}>
          <input
            type={"text"}
            name={"fromWhere"}
            onChange={onChangeHandler}
            list={"address1"}
            placeholder="Search for a country"
            value={formInput.fromWhere}
          />
          <datalist id="address1">
            <option value="USA">United States of America</option>
            <option value="CAN">Canada</option>
            <option value="GBR">United Kingdom</option>
            <option value="GER">Germany</option>
            <option defaultValue value="FRA">
              France
            </option>
            <option value="JPN">Japan</option>
            <option value="AUS">Australia</option>
            <option value="BRA">Brazil</option>
            <option value="IND">India</option>
            <option value="CHN">China</option>
          </datalist>
        </CustomInput>
        <CustomInput className={classes.input_text} label={"To where?"}>
          <input
            type={"text"}
            name={"toWhere"}
            onChange={onChangeHandler}
            list={"address1"}
            placeholder="Search for a country"
            value={formInput.toWhere}
          />
          <datalist id="address1">
            <option defaultValue value={"Afganistan"}></option>
          </datalist>
        </CustomInput>
        <div className={classes.date_and_pay_button}>
          <div>
            <CustomInput label={"Leaving on"}>
              <input
                type={"date"}
                name={"LeavingOn"}
                onChange={onChangeHandler}
                value={formInput.LeavingOn}
                min={new Date().toISOString().substr(0, 10)}
              />
            </CustomInput>
            <CustomInput label={"Returning on"}>
              <input
                type={"date"}
                name={"returningOn"}
                onChange={onChangeHandler}
                value={formInput.returningOn}
                min={new Date().toISOString().substr(0, 10)}
              />
            </CustomInput>
          </div>
          <div className={classes.booking_button}>
            {!isLoading ? (
              <button onClick={onPayHandler}>Book now</button>
            ) : (
              <Loading />
            )}{" "}
          </div>
        </div>
      </div>
      <div className={classes.info_tab}>
        <p>Payments are in etheruem</p>
      </div>
    </div>
  );
};
export default FlightBooking;
The code mentioned above can be located in the “FlightBooking.js” file inside the Component folder within the BookingCenter folder. It imports the ContractHook component to access the contract instance, user address, and deposit balance. Additionally, it imports other components such as CustomInput, Swal (used for displaying messages), and Loading (used for showing a loading icon).
The component utilizes the useState hook to manage the state of the form inputs and loading status. It sets the initial state of the form inputs to default values and updates the state whenever there are changes in the input fields.
The component renders a form with multiple input fields for selecting flight details, including itinerary, number of passengers, fare type, departure and return dates, and destination. It also includes a “Book now” button to submit the form.
Upon clicking the “Book now” button, the component checks if the user has enough funds in their deposit balance. If the balance is less than 2, an error message is displayed. Otherwise, it initiates a booking transaction by invoking the FlightBookings method on the contract instance with the provided form input values. The component displays success or error messages using Swal and updates the loading state accordingly.
Furthermore, the component includes a message tab that presents information about payment in Ethereum. Finally, the component is exported as the default export of the module, allowing it to be used in other parts of the application.
Booking a Hotel
In this section, we will reserve the hotel using only 1 CELo as payment. It’s important to note that we still have 3 CELO left in our account. Therefore, we will use 1 CELO from our balance to complete the hotel booking. The video below demonstrates the process of reserving a hotel in the travel booking DApp.
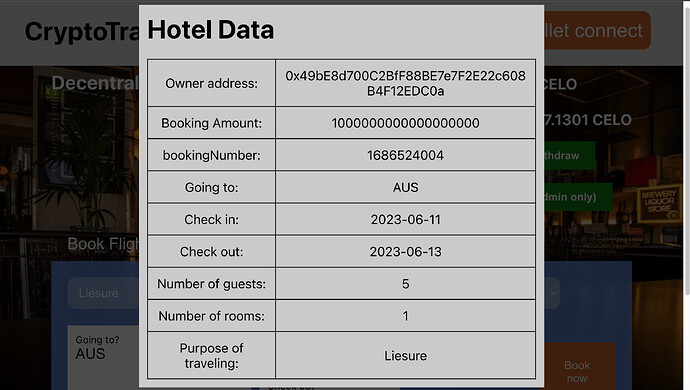
Once we made the hotel reservation, we had a remaining balance of only 2 CELO. We will explain how we will withdraw this amount in the following part of this article. To access the information about the hotel we booked, please click on “Booked Hotel” located at the top header of the user interface (UI). Below, you will find the output displaying our hotel booking data.
Below is the code that retrieves the booking data we have paid for. Celo was instrumental in helping us achieve this. Additionally, you will find an explanation of the code below it.
const [hotelBookingData, setHotelBookingData] = useState({});
const { contractInstance, address } = ContractHook();

// Get Hotel Booking Data
useEffect(() => {
  contractInstance.methods
    .hotelBookingAddress(address)
    .call()
    .then((data) => {
      console.log(data);
      setHotelBookingData(data);
    })
    .catch((error) => {
      console.log(error);
    });
}, []);
The given code retrieves details regarding hotel reservations from a smart contract by utilizing the contractInstance and address parameters. Subsequently, it stores this information in the hotelBookingData variable, which signifies the present condition of the bookings.
Hotel Booking Code:
In this section, we will be examining the underlying code responsible for the hotel booking system. You don’t need to create the entire code from the beginning, as we will simply be referring to it. A detailed explanation of the code can be found below the code itself.
Solidity:
function HotelBookings(
    string memory goingTo,
    uint256 numberOfGuest,
    uint256 numberOfRooms,
    string memory purposeOfTraveling,
    string memory checkIn,
    string memory checkOut
) public {
    // Check insufficnent funds
    require(
        balanceAddress[msg.sender] >= 1 ether,
        "Insufficient funds, please deposit at least 1 eth to wallet."
    );
    uint256 bookingNumber = block.timestamp;
    HotelBookingStruct memory booking = HotelBookingStruct(
        address(msg.sender),
        bookingNumber,
        checkIn,
        checkOut,
        goingTo,
        numberOfGuest,
        numberOfRooms,
        purposeOfTraveling,
        uint256(1 ether)
    );
    hotelBookingAddress[msg.sender] = booking;
    balanceAddress[msg.sender] -= 1 ether; // Deducting funds (1 ether)
}
The code above represents a function named “HotelBookings” which accepts various parameters concerning a hotel reservation. It verifies whether the person initiating the transaction possesses a balance of at least 1 ether. If the condition is met, it generates a booking structure using the given details. The booking is linked to the address of the person initiating the transaction and stored in a mapping data structure. Finally, the balance of the person initiating the transaction is decreased by 1 ether.
ReactJs:
import React, { useState } from "react";
import ContractHook from "../../Hooks/ContractHook";
import classes from "./BookingCenter.module.css";
import CustomInput from "./CustomInput";
import Swal from "sweetalert2";
import Loading from "../LoadingIcon/Loading";
const HotelBooking = () => {
 const [formInput, setFormInput] = useState({
   purposeOfTraveling: "Business",
   numberOfGuest: 1,
   numberOfRooms: 1,
   goingTo: "",
   checkIn: new Date().toISOString().substr(0, 10),
   checkOut: new Date(new Date().setDate(new Date().getDate() + 2))
     .toISOString()
     .slice(0, 10),
 });
 const [isLoading, setIsLoading] = useState(false);
 const onChangeHandler = (e) => {
   setFormInput((prevState) => {
     return {
       ...prevState,
       [e.target.name]: e.target.value,
     };
   });
 };
 const { contractInstance, address, depositBalance } = ContractHook();
 const onPayHandler = () => {
   if (depositBalance < 1) {
     return Swal.fire(
       "Insufficient funds!",
       `Insufficient funds please fund your account and try again later.`,
       "error"
     );
   }
   setIsLoading(true);
   contractInstance.methods
     .HotelBookings(
       formInput.goingTo,
       parseInt(formInput.numberOfGuest),
       parseInt(formInput.numberOfRooms),
       formInput.purposeOfTraveling,
       formInput.checkIn,
       formInput.checkOut
     )
     .send({
       from: address,
       gas: 3000000,
     })
     .on("transactionHash", (hash) => {
       console.log("Transaction hash:", hash);
     })
     .on("receipt", (receipt) => {
       console.log("Receipt:", receipt);
       Swal.fire(
         "Booking successful!",
         `Your hotel booking was successful.`,
         "success"
       );
       setIsLoading(false);
     })
     .on("error", (error) => {
       console.error("Error: occured", error);
       Swal.fire(
         "Transaction failed!",
         `Attempt to withdraw from booking wallet balance failed in the transaction.`,
         "error"
       );
       setIsLoading(false);
     });
 };
 return (
   <div className={classes.flight_booking_wrapper}>
     <div className={classes.open_tab}>
       <select
         value={formInput.purposeOfTraveling}
         name="purposeOfTraveling"
         onChange={onChangeHandler}
       >
         <option value="Business">
           WHAT ARE YOU TRAVELLING FOR? (Buesiness?){" "}
         </option>
         <option value="Business">Business</option>
         <option value="Liesure">Liesure</option>
       </select>
       {/* Numbers of passanger */}
       <select
         onChange={onChangeHandler}
         value={formInput.guestNumber}
         name="numberOfGuest"
       >
         <option value="1">1 Guest</option>
         <option value="2">2 Guests</option>
         <option value="3">3 Guests</option>
         <option value="4">4 Guests</option>
         <option value="5">5 Guests</option>
         <option value="6">6 Guests</option>
         <option value="7">7 Guests</option>
         <option value="8">8 Guests</option>
       </select>
       <select
         onChange={onChangeHandler}
         value={formInput.roomNumber}
         name="numberOfRooms"
       >
         <option value="1">1 Room</option>
         <option value="2">2 Rooms</option>
         <option value="3">3 Rooms</option>
         <option value="4">4 Rooms</option>
         <option value="5">5 Rooms</option>
         <option value="6">6 Rooms</option>
         <option value="7">7 Rooms</option>
         <option value="8">8 Rooms</option>
       </select>
     </div>
     <div className={classes.custom_input_container}>
       <CustomInput className={classes.input_text} label={"Going to?"}>
         <input
           type={"text"}
           list={"address1"}
           value={formInput.goingTo}
           name="goingTo"
           onChange={onChangeHandler}
           placeholder="Destination, city or hotel name"
         />
         <datalist id="address1" onChange={onChangeHandler}>
           <option value="USA">United States of America</option>
           <option value="CAN">Canada</option>
           <option value="GBR">United Kingdom</option>
           <option value="GER">Germany</option>
           <option defaultValue value="FRA">
             France
           </option>
           <option value="JPN">Japan</option>
           <option value="AUS">Australia</option>
           <option value="BRA">Brazil</option>
           <option value="IND">India</option>
           <option value="CHN">China</option>{" "}
         </datalist>
       </CustomInput>
       <div className={classes.date_and_pay_button}>
         <div>
           <CustomInput label={"Check in"}>
             <input
               type={"date"}
               min={new Date().toISOString().substr(0, 10)}
               onChange={onChangeHandler}
               value={formInput.checkIn}
               name={"checkIn"}
             />
           </CustomInput>
           <CustomInput label={"Check out"}>
             <input
               type={"date"}
               min={new Date().toISOString().substr(0, 10)}
               onChange={onChangeHandler}
               value={formInput.checkOut}
               name={"checkOut"}
             />
           </CustomInput>
         </div>
         <div className={classes.booking_button}>
           {!isLoading ? (
             <button onClick={onPayHandler}>Book now</button>
           ) : (
             <Loading />
           )}
         </div>
       </div>
     </div>
     <div className={classes.info_tab}>
       <p>CELO Blockchain </p>{" "}
     </div>
   </div>
 );
};
export default HotelBooking;
The above code can be found in the BookingCenter section of the component folder, specifically in the file named HotelBooking.js. It contains the implementation of a React functional component called HotelBooking, which represents a hotel booking form. The component imports and utilizes the ContractHook component, along with other dependencies like sweetalert2 for notifications and a loading icon component.
To manage state variables, the component employs the useState hook. It initializes the state of the form inputs with default values for fields such as purpose of traveling, number of guests and rooms, destination, check-in date, and check-out date.
Whenever there is a change in the form inputs, the onChangeHandler function is invoked to update the relevant state variables.
The ContractHook component is called upon to fetch the contract instance, user address, and deposit balance.
The onPayHandler function is triggered when the user clicks the “Book now” button. It checks if the deposit balance is sufficient, and if it is not, an error notification is displayed. If the balance is sufficient, a transaction is sent to the contract using the HotelBookings method, along with the provided form input values. The events of the transaction are logged, and success or error notifications are shown accordingly. The loading state is toggled during the transaction.
Balance Withdrawal
In this part, we will be retrieving the remaining funds from our smart contract. To recap, we only have 2 CELO left in our wallet, and we need to transfer it back to our MetaMask wallet. The following example illustrates the process of withdrawing the remaining 2 CELO to our wallet.
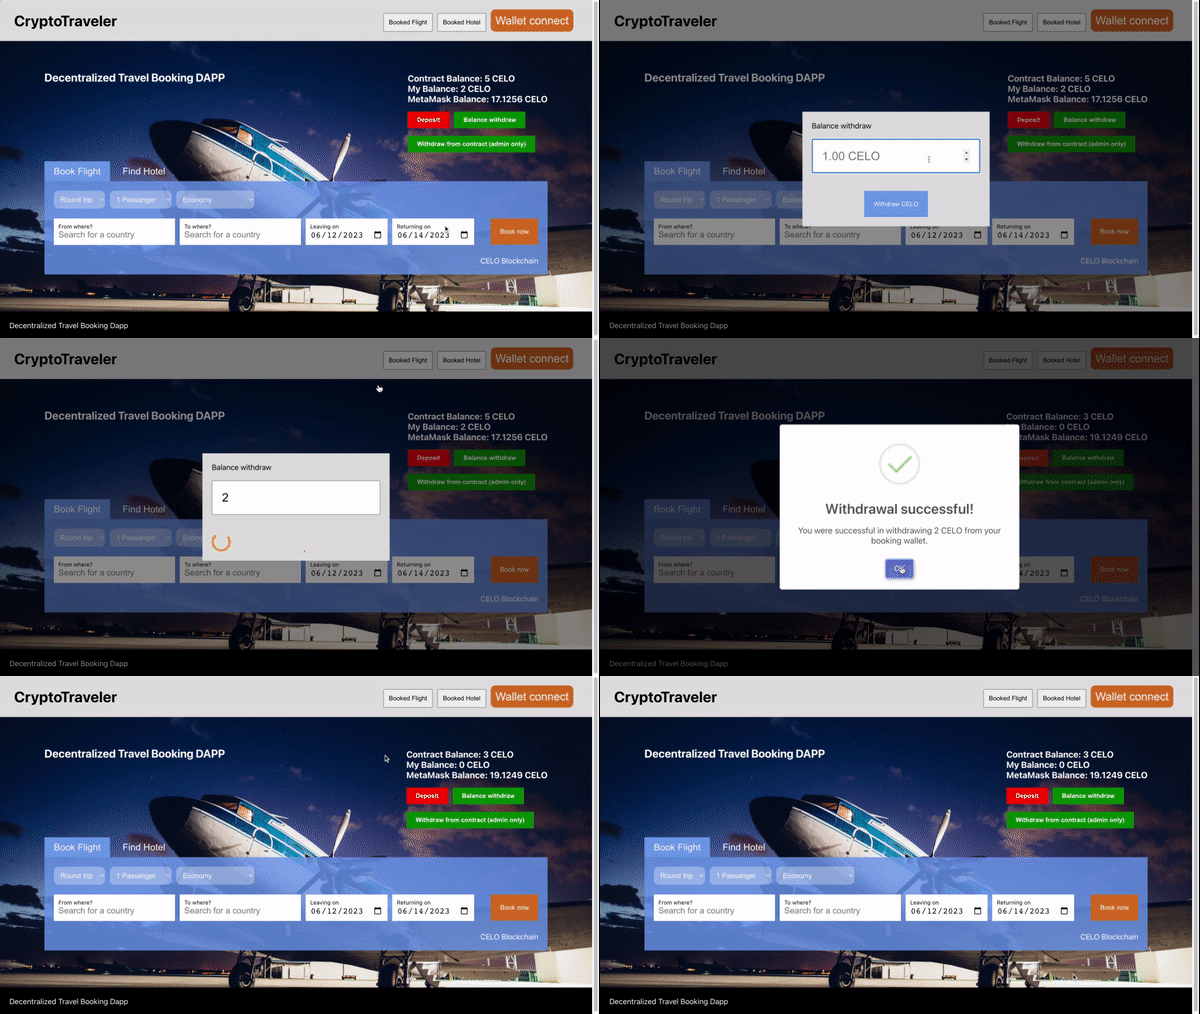
In the presented video, we effectively transferred the remaining amount of 2 CELO from the contract wallet to our MetaMask wallet. As shown in the output, it is evident that we now have only 3 CELO left in the Contract balance. This decrease occurred because we initially used 2 CELO for the flight reservation and subsequently used 1 CELO for the hotel reservation, resulting in a remaining balance of 3 CELO in the contract.
The Withdrawal Code
In this section, we will provide an explanation of the Solidity and React code for withdrawing CELO in the DApp.
Solidity:
The code below is a function called balanceWithdraw that allows users to withdraw a specified amount of their balance. It checks if the user has sufficient funds, transfers the amount in wei to their address, and updates their balance accordingly.
// User to withdraw balance
function balanceWithdraw(uint256 _amount) public {
    uint256 amountInWei = _amount * 1 ether;
    require(balanceAddress[msg.sender] >= amountInWei, "Insufficient funds");
    payable(msg.sender).transfer(amountInWei);
    balanceAddress[msg.sender] -= amountInWei;
}
ReactJs:
The following code represents the withdrawal functionality in a React application. You can locate this code within the Component folder, specifically in a folder named “Withdraw.” Below, we will explain how the code functions.
import React, { useState } from "react";
import ContractHook from "../../Hooks/ContractHook";
import classes from "./Withdraw.module.css";
import Swal from "sweetalert2";
import Loading from "../LoadingIcon/Loading";
const Withdraw = (props) => {
  const [amount, setAmount] = useState("0");
  const [isLoading, setIsLoading] = useState(false);
  const { contractInstance, kit, address } = ContractHook();
  const onChangeHandler = (el) => {
    setAmount(el.target.value);
  };
  const onSubmitHandler = () => {
    if (amount.length < 1) return alert("Please input a value");
    const confirm = window.confirm(
      `Are you sure you want to withdraw ${amount} CELO`
    );
    if (confirm) {
      // Withdraw to contractInstance
      setIsLoading(true);
      contractInstance.methods
        .balanceWithdraw(amount)
        .send({
          from: address,
          gas: 3000000,
        })
        .on("transactionHash", (hash) => {
          console.log("Transaction hash:", hash);
        })
        .on("receipt", (receipt) => {
          console.log("Receipt:", receipt);
          Swal.fire(
            "Withdrawal successful!",
            `You were successful in withdrawing ${amount} CELO from your booking wallet.`,
            "success"
          );
          setIsLoading(false);
          setTimeout(() => {
            props.closeModal();
          }, 3000);
        })
        .on("error", (error) => {
          console.error("Error: occured", error);
          Swal.fire(
            "Transaction failed!",
            `Attempt to withdraw from booking wallet balance failed in the transaction.`,
            "error"
          );
          setIsLoading(false);
        });
    }
  };
  // Closing the modal
  const onCloseModal = (el) => {
    if (el.target.id === "parent-modal") {
      props.closeModal();
    }
  };
  return (
    <div className={classes.container} onClick={onCloseModal} id="parent-modal">
      <div className={classes.wrapper}>
        <p>Balance withdraw </p>
        <br></br>
        <div>
          <input
            onChange={onChangeHandler}
            type={"number"}
            placeholder="1.00 CELO"
          />
          <br />
          <br />
          <br />
          {!isLoading ? (
            <button onClick={onSubmitHandler}>Withdraw CELO</button>
          ) : (
            <Loading />
          )}
        </div>
      </div>
    </div>
  );
};
export default Withdraw;
The provided code showcases a React functional component named Withdraw. Its purpose is to display a modal window enabling users to withdraw a specific amount of CELO, from their booking wallet.
To accomplish this, the component imports various dependencies such as the useState hook from React, the ContractHook component from a local file, Swal from the “sweetalert2” package, and the Loading component from another local file.
Within the component, it initializes state variables utilizing the useState hook, including amount to store the withdrawal amount and isLoading to indicate whether a withdrawal is currently in progress. Additionally, it extracts the contractInstance, kit, and address variables from the result obtained by invoking the ContractHook component.
Two functions are defined within the component: onChangeHandler to handle modifications in the input field for the withdrawal amount, and onSubmitHandler to manage the form submission for the withdrawal process. The onSubmitHandler function conducts several checks, confirms the withdrawal with the user, and if confirmed, sends a transaction to the contractInstance to withdraw the specified amount of CELO. It also employs Swal, the previously installed sweetalert2 package, to provide loading feedback as well as success/error notifications.
Furthermore, the component incorporates an onCloseModal function to handle the closure of the modal window when the user clicks outside its designated area.
Withdraw all (only admin)
This portion will focus on the complete withdrawal of funds from the contract. The video demonstration presented below showcases the procedure for withdrawing all funds from the contract. It is important to understand that this action can only be carried out by the administrator, as the transaction requires administrative privileges. The administrator refers to the specific address that initially deployed the smart contract.
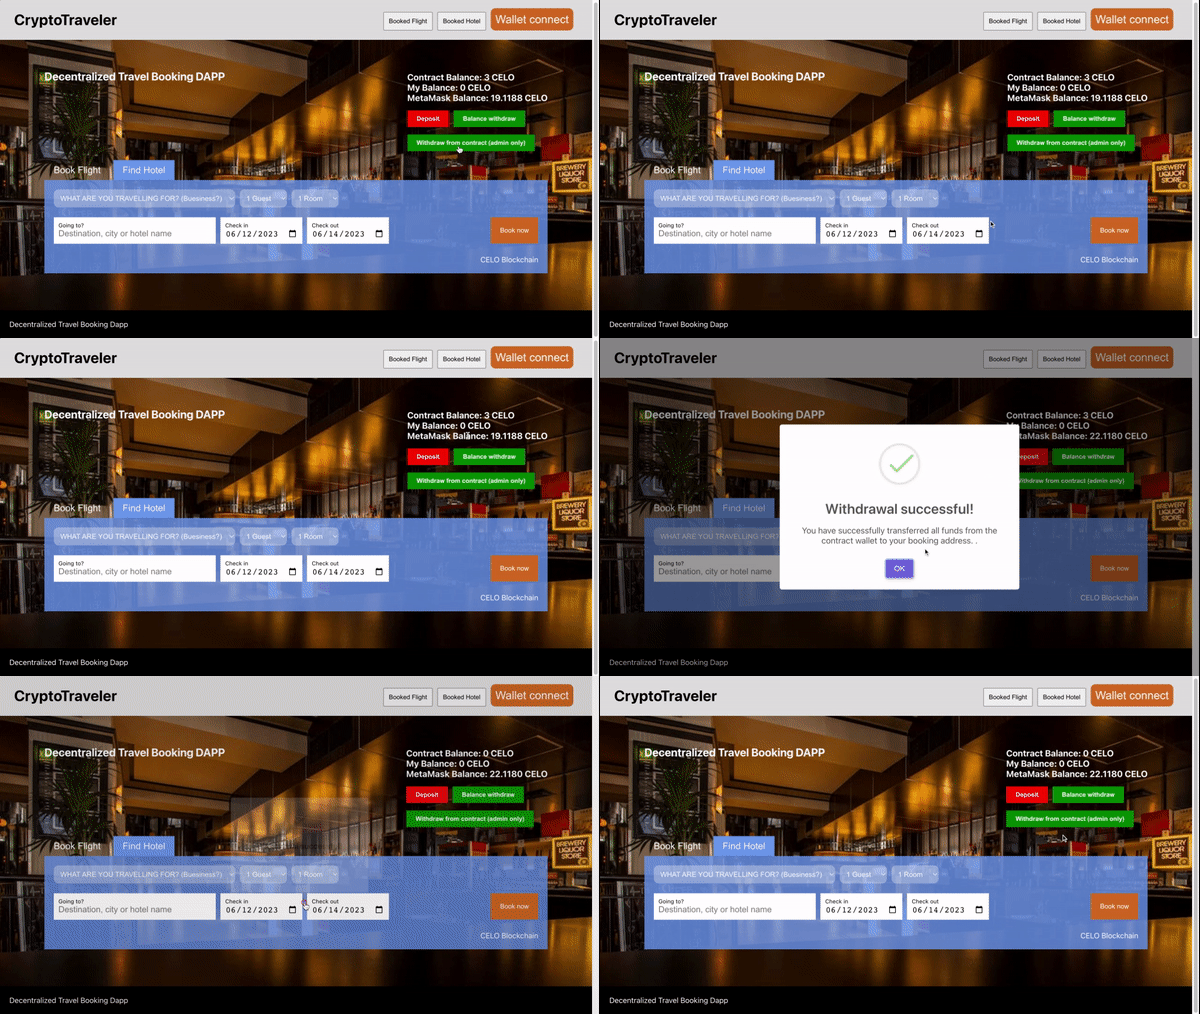
In the output shown above, we selected the option to “withdraw from the contract.” This action resulted in the deduction of 3 CELO, which was the remaining balance in the contract. The following is the code used to implement this mechanism.
Solidity:
function withdrawAllFunds() public onlyAdmin {
    payable(admin).transfer(contractBalance());
    balanceAddress[msg.sender] = 0;
}
The code grants the administrator the ability to retrieve all funds from the contract. It moves the contract’s balance to the administrator’s address and resets the balance of the sender to zero.
ReactJs:
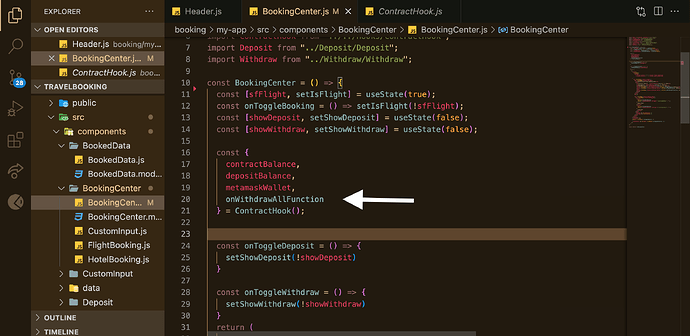
The withdrawing all-for-only admin functionality in the front-end code can be located in the “BookingCenter” folder within the component folder. The component file responsible for this functionality is named BookingCenter.js. However, instead of writing the actual function for withdrawing all funds within this file, we have imported the onWithdrawAllFunction from the ContractHook file, as mentioned earlier in the article.
The accompanying image depicts an arrow indicating the imported function from the contract hook. The onWithdrawAllFunction is a function that will be triggered when a button handler is clicked.
To gain a deeper understanding of the role of the function within the contract hook, all you need to do is access the contract hook and observe the following function:
const onWithdrawAllFunction = () => {
  contractInstance.methods
    .withdrawAllFunds()
    .send({
      from: address,
      gas: 3000000,
    })
    .on("transactionHash", (hash) => {
      console.log("Transaction hash:", hash);
    })
    .on("receipt", (receipt) => {
      console.log("Receipt:", receipt);
      Swal.fire(
        "Withdrawal successful!",
        `You have successfully transferred all funds from the contract wallet to your booking address.        .`,
        "success"
      );
    })
    .on("error", (error) => {
      console.error("Error: occured", error);
      Swal.fire(
        "Transaction failed!",
        `Attempt to withdraw from booking wallet balance failed in the transaction.`,
        "error"
      );
    });
};
When the aforementioned function is invoked upon clicking the button, it initiates the process of retrieving all funds from a particular contract instance. It transmits a transaction to the contract, specifies a gas limit, and manages various events. In the event of a successful withdrawal, it presents a success message using Swal.fire from the sweetaler2 we installed. Conversely, if an error occurs, it presents an error message.
Conclusion
I hope you found this article enjoyable to read. It discusses the utilization of React-Celo alongside Celo ContractKit. This article covers a wide range of topics, and I encourage you to apply the knowledge gained here to create more advanced Dapps. Doing so will enhance your understanding and facilitate collaboration with other developers, whether it’s for remote work, client projects, team efforts, or personal undertakings. The GitHub repository containing the code discussed in this article is accessible; you can click here to access it. Thank you for taking the time to read this.
About the Author
Gabriel Delight is a highly experienced Blockchain Engineer and Web developer. He possesses a strong skill set and expertise in technical writing. His goal is to utilize his wide range of skills and knowledge to make valuable contributions to a dynamic organization’s success. He has a genuine passion for crafting top-notch web applications and producing technical content that is precise, easily understandable, and filled with valuable information. You can connect with him via his social media profile: LinkedIn and Twitter.

